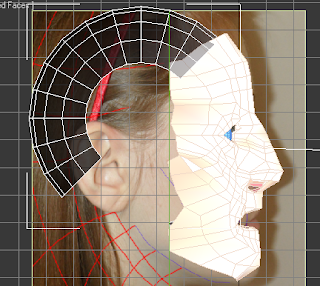
The next stage of the head's development is to actually construct the back of the head. In order to do this, I had to make adjustments to the reference topologies to include reference lines for the rest of my head and my neck:
This was then imported into 3D Studio Max and used as a replacement to the images used before on my reference plates. Now, I was all ready to begin modelling the back of my head. First, I created a sphere roughly the same size as the back of my head and then rotated it by 90 degrees in two directions to give me the image on the right:
Next, I resized the sphere to fit in with the size of my mask more accurately (see image below). In order to reduce the number of polygons on the sphere, I counted the number of polygons on one side of my forehead and reduced the number of sides until, using the edges as guides, both the sphere and the mesh lined up. It does not matter if the sphere overlaps the mask because what had to be done next would rectify that.
Using the Paint Selection Region tool, I highlighted all of areas which I wanted to delete on the sphere. These polygons would not be used in the final model. It was also important to ensure that the polygons selected apply to both sides of the head.
The image below shows the remaining head segments. It was necessary to delete the right hand side of the head because, seeing as the mesh has a symmetry modifier applied to it, it would be a waste of polygons, which in turn would take it longer and use more resources to render.
One of the difficult parts of primitive extension tutorial video is to line all of the points up between the skull and the face. I made sure the snap tool was on to make it a bit easier for myself and to ensure that they were snapping to the correct vertices.
The image below shows the forehead connected to the skull:
One of my setbacks was that I incorrectly counted the number of polygons across the forehead of my mesh because of the viewport angle. This meant that I had to restart this section again (and will explain the differences in the colour between the images above and the following images below).
This is the finished skull after it had been jointed to the face mesh. The next step was to extend the polygons down the back of the neck and to join them up with the chin, connecting all the other polygons on the side of the face. However, in order to do that and to be more resourceful, I deleted some of the extra polygons that were not needed:
This is a before screenshot:
This is an after screenshot:
The image below is a screenshot of what my head looked like after I filled in all the polygons for my head and neck and then joint them together to form one object using the Attach tool. The result is far from perfect but it is a good start:
Snapshot of me attempting to remove some of the harshness between the joint using the Soft Selection tool.
Unfortunately, I have run out of time to complete my face model before my unofficial deadline date to check to see how well my work is progressing, however I have a few weeks yet before my final deadline date. All this said, I am confident that with a little more time and some guidance I will be able to improve greatly on the work I have completed so far and, conducting my own research, apply hair to the head, eyelashes and eyebrows. I am very pleased with the way my work has progressed so far.


No comments:
Post a Comment