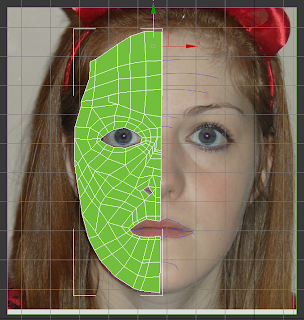
 Halfway through: I have concentrated around the eye to keep as close to my original markings as possible to give the most realistic outcome.
 Finished: I have followed almost all of the lines which I added onto the original photograph in Photoshop. If I need to make any adjustments to the mesh, it can be done later after I experiment with the Attach tool. However, from first glance, there appears to be nothing wrong with the mesh and I should have only limited issues such as small gaps where the lines haven't connected properly.
Next, I converted the top quadrant to a polygon and then used the Attach tool to select all of the lines in the mesh and join them together because at that moment, they were acting as separate shapes and not as one whole polygon.
However, once this was completed, it became obvious that there were gaps in the mesh which needed to be corrected:

In this screenshot, you can see the gaps just above the eye. In order to fix this, I used the weld tool.
The idea of the weld tool is to join polygons together (which would in turn remove all of the unwanted gaps in the mesh) in order to reduce the number of polygons down to make it easier to model with. Otherwise, it could be much more fiddly and tricky than it needs to be.

This image is the before screenshot, which shows the original polygon count and what it will be reduced to after just one increment. It is important that the threshold increase is not too much; otherwise the wrong polygons will be joint together as well.
However, after completing these steps, I realised that I forgot to make a hole for the nostril. This is a mistake because I will need a hole in the mesh (similarly to the eyes and mouth) so I would be able to model the nose correctly and make it look realistic.

I also noticed that the nose shape did not look very realistic and I had missed out several lines which would be vital in creating the bridge of the nose. So I had to make adjustments.
The final step in this stage was to move the planes and freeze them in place for the next step which will be posted in another blog entry.


No comments:
Post a Comment