Now it is time to go back into Photoshop to sort out the images and prepare them for the bump painting which is the next step. I created a copy of the UV co-ordinates map render and opened it up in Adobe Photoshop. A new layer was created and was coloured a different, bright colour to make the topology very easy to see, and therefore making the material matching up phase easier for myself.

Using Quick Mask mode, it allowed me to select just the topology lines. I ensured that the line select thickness was set at 4 in order to make the topology more easily seen.

This was then pasted over the top of the black layer and I exited Quick Mask mode:

Once the layer mask has been added to the layer, it will go transparent:

The next step was to copy and paste parts from my reference images and match it up to my topology. The image below shows the beginning of this process:

This is the topology part of the way through. I found it very difficult to match up because each side of my face is a different shape. So I tried cloning and copying the other side of my face to make it look more symmetrical. While it may not look as realistic for now, it will look better once it has been applied to the actual model.

The next issue I encountered was that half of my face was a different colour in the reference images due to shadowing caused by the environment lighting. At first, I was unsure how to fix this however, I found that if I modified the exposure levels, I could match up the colours quite nicely:

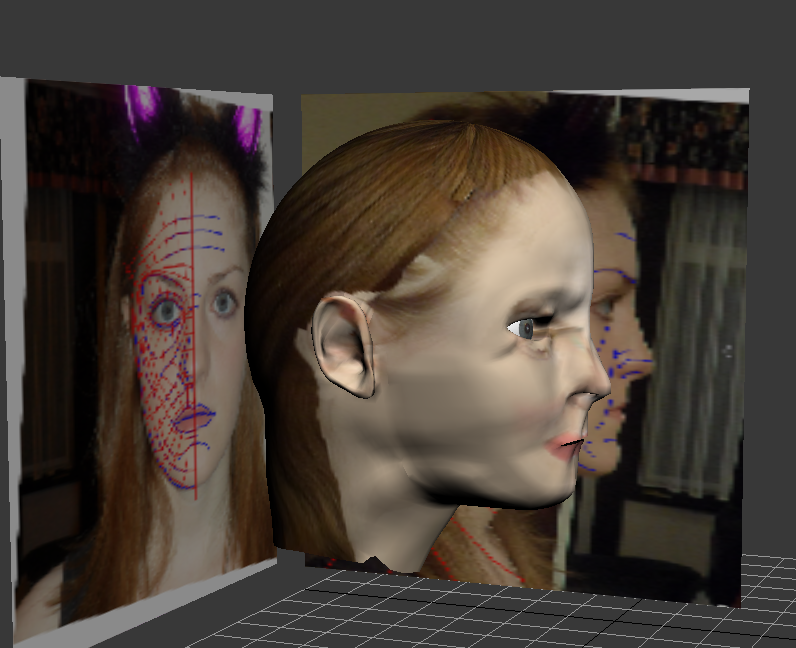
I thought it would be a good idea to put my mesh as it is at the moment into 3D Studio Max to see how well it fits to the model. To make it look more realistic, I created a cut out from my eye and used that as a material for my eyeballs:

I decided to apply the image to my face to see how it looked, there were still issues with one side of the face being too dark so I went back into PhotoShop and made the necessary adjustments. Overall though, I was very pleased with how well the material was fitting to my face:

In the image below, I managed to equalize the skin tone to match the face so it looks Nearly finished! Just need to line up the ears because they managed to fit in the space after some tweaking. I also need to remove the shadows from the chin and the side of the face to even it out.

Nearly there now! There are a few issues with the hair at the top of the head and also there is not a smooth transition between the two different sides of the head.

This a side view of my finished UVW Map material. Overall, I am very happy with it, particularly the ear because the material fitted perfectly and it looks very much like my own ear now. There is some pinching near the eyes however due to time constraints, I will not have time to go back and sort out these problems.
Another view:

No comments:
Post a Comment