Firstly, I had my photograph taken on a blank background; one image was a front facial shot and one was a side on view. I uploaded them onto the computer via USB cable and loaded them into Adobe Photoshop:
<<<<< Front view of my face.
<<<<<< Side view of my face.
In order to create a 3D model of my face in 3D Studio Max, I will need to create reference plates which will be imported and used as a guide. For this to be accomplished; the face has to be as symmetrical as possible. Therefore, in this first post on my blog, I am going to describe and show how I made the images more ideal for use.
First of all, the images were cropped using the Cropping Tool and then the Lens Correction Tool was used. (Filter Menu Option):
The Remove Distortion feature allows you to remove any distortion that was taken with the picture, due to the camera position. There are three types of distortion which can be corrected: Barrel, Pincushion and Complex.
<<
<<
<<
<<
Barrel Distortion is when the image that has been captured appears to have been mapped around a sphere, creating a fisheye effect.
<<
<<
<<
<<
<<
<<
<<
<<
<<
<<
Pincushion Distortion is when the image that has been captured slightly bends at the corners, like a cushion.
<<
<<
<<
<<
<<
<<
<<
<<
<<
Pincushion Distortion is when the image that has been captured slightly bends at the corners, like a cushion.
<<
<<
<<
<<
<<
<<
<<
<<
<<
<<
<<
<<
<<
<<
Complex Distortion is a mixture of both Barrel and Pincushion distortion.
<<
<<
<<
<<
<<
<<
<<
<<
<<
<<
After correcting the distortion, I noticed that the camera angles on both images were slightly out and the images did not show a true representation of the front view or side view of my face. The Vertical and Horizontal Perspective tools were used in order to rectify this.
Finally, I needed to adjust and line up the features on my face to make them more symmetrical. For this, I used the straighten tool and I used the pupils of my eyes as a guide. As you can see from the image below, one eye is slightly higher up than the other.
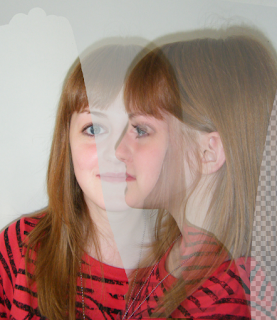
Next, I placed both images onto the same canvas and enlarged the canvas to make the images easier to compare and work with. In order to compare the images, I made layer 1 (the side view image) 70% transparent and lined it up with the front view image:
<<<
As you can see, none of the key features on the face line up with each other (top of the head, eyebrows, eyes, nose, mouth and chin). It is vital that that they do because otherwise when you start modelling, one side of the face will not match up with the other. If the features line up, then if you only concentrate on modelling one side of the face, you know that the rest of the face will match up proportionally too.
<<<
In order to rectify the issue, I used the rotate tool and kept adjusting the images until they lined up. To double check this, I used the ruler guides (see image below):
Looking at the image above, I believe I have done a good job at matching up both images. I can now progress onto the next phase which is defining the topology lines.


No comments:
Post a Comment